How to do the manoeuvres required on the driving test.
Reversing into a road on the left
The examiner will say something like: " Pull up before the next road on the left. I would like you to reverse into this road on the left, drive past it and stop. Back in, and continue to drive for some distance in reverse - keep reasonably close to the kerb "
This reversing exercise can be tricky for learner drivers, due to the lack of visibility to the rear of the car. It also requires accurate steering in order to keep the car reasonably close to the kerb. To make steering easier here, try to think in terms of steering towards the kerb or away from the kerb, rather than turning the wheel left or right.
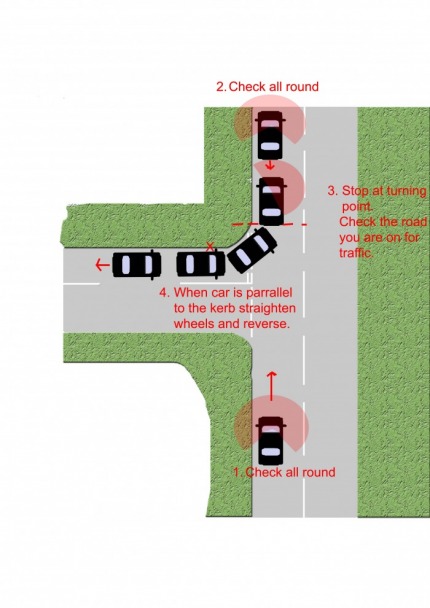
1) Before driving to the other side of the road, check all your mirrors and blindspots, paying particular attention to the right hand side, which is where traffic will be coming from. As you drive past the road, look into it to ensure there are no hazards such as children playing, or parked vehicles. As you pass the road to pull over indicate if necessary.
2) Once at the other side apply the hand brake and select reverse gear. (Turn off your signal if you used one). Again, check all round your car for traffic on the road. When clear, reverse back to the corner. Keep the car straight... do not try to steer round the corner yet.
3) Your turning point is when the back of your car is level with the first curved kerb stone on the corner. One way of knowing you are at this point is to look out of your rear passenger window. You should see the kerb area, marked X on the diagram, in this side window. If you can't see this because you aren't tall enough, try looking in your left door mirror. The kerb should just disappear from view. This is your turning point.
Before steering left, check all around you, but especially the road on your right side... as this is where approaching traffic will be coming from. It is important to check the road is clear, because when you steer left, the front of the car will swing out to the right.
Start by turning the wheel medium brisk, then steer slightly toward or away from the kerb, to keep the car within about a drain's width of the kerb. If you saw the kerb in the rear passenger window at your turning point, all you need to do here is keep the kerb visible in that same place as you steer round the corner.
4) Once the kerb disappears into the support pillar at the back of the car, then reappears in the rear window, check your left door mirror to ensure your car is parallel to the kerb. When it is parallel, straighten the car up. This is done by steering away from the kerb until the car moves back in a straight line. You are simply turning the steering wheel away from the kerb by the same amount you steered toward the kerb before. Remember, when your car is straight, the steering wheel will be up the right way!
Try to look out of the back of the car and all around every so often, and do not get fixated on the left door miriror, as it gives you very little idea of what is going on around you. You should only need the mirror to check that you are parallel with the kerb when you straighten up.
Usually, the examiner will tell you when to stop in this exercise, but if not, reverse back for about 3 car lengths then stop, apply the handbrake and select neutral.
Reverse park (parallel park)
The examiner will say something like: " Pull up on the left well before the next stationary car please. I'd like you drive along side the car and reverse into the space behind it, finishing reasonably close, and parallel to the kerb, and within one to one and a half car lengths distance".
Just like the reversing into a road on the left, the trick here is to keep good control of the speed of the car. You must not drive backwards so fast that you miss your turning points, as this will lead to the car being either too far out from the kerb, or hitting the kerb. Keeping the speed down also allows plenty of time for good observation, which is very important in this exercise, as once you have passed your test, you will often be doing this in an area where there may be lots of hazards.
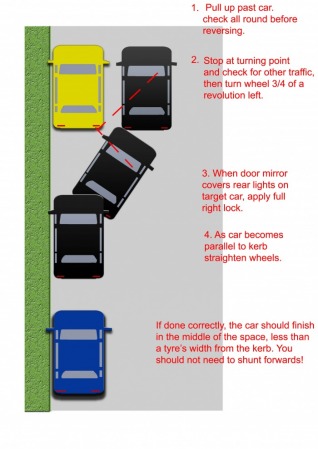
1) Pull up just past the target car, indicating as you pull over, if necessary. Get into reverse gear, then turn off signal (if applied). Check all around your car for activity.
2) Reverse until you see the end of the target car in your rear passenger window (indicated by red dotted line on diagram). The back of your car is now level with the end of the target car. Look all around your car again (remember the blind spot on your right side!) and when safe turn the wheel 3/4 of a revolution toward the kerb.
3) Drive backwards until your car is about a drains width from the kerb. At this point your left door mirror obscures the rear light cluster on the drivers side of the target car (shown by dotted line on diagram). Try to keep moving slowly and turn the wheel full right lock (just turn it quickly until you can't turn it any more).
4) When the front of the car has moved in enough for the car to be parallel to the kerb, straighten the road wheels by undoing the right lock (turn the wheel back toward the kerb about 1 1/2 turns. The steering wheel should finish up the right way). If you can't tell when you are parallel to the kerb, try looking in the left door mirror to judge it. When done correctly this will leave the car parked within one and a half car lengths of the target car. If you have to shunt forward to straighten the car up, then do so, but it shouldn't really be necessary. When you've finished, apply the handbrake and select neutral.
Turn in the road
The examiner will say something like: " I would like you to turn the car round to face the other way using forward and reverse gears.Try not to touch the kerb when you are turning " (They may leave out the bit about forward and reverse gears).
This is the easiest of the low speed control exercises, as it requires less precise judgement.
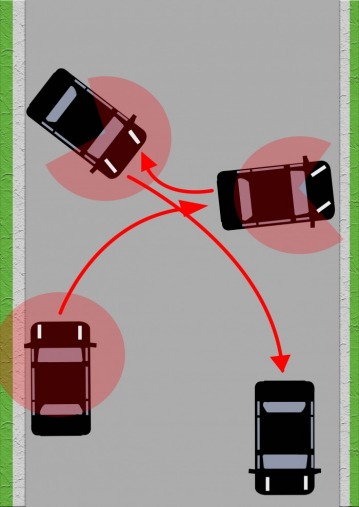
1) Pull up as close to the kerb as you can. Prepare the car to move, then check all around the vehicle for activity, especially traffic approaching from behind. Release the handbrake and as soon as the car is moving, apply full right lock. As you get close to the kerb on the other side of the road, steer back to the left about one revolution (this does not need to be precise). Look for the kerb to appear underneath your right door mirror if you cannot judge how close you are to the kerb.
2) When stopped, apply the handbrake. Select reverse gear and check all around the car for activity. If it is clear, reverse back slowly, applying full left lock on the steering wheel. While moving back it is important that you look up and down the road and also behind you! It is easy not to notice a pedestrian about to walk behind your car! As you get close to the kerb behind you, turn the wheel back to the right about one revolution ( again this does not have to be accurate). You can tell when you are nhear the kerb behind you by looking out of the drivers window. You will see the kerb in the bottom right corner of the window, at which point you should stop and apply the handbrake.
3) Select first gear, prepare to move, and check all around to make sure it is safe to drive away. Release handbrake and steer back down the road. You only need to steer enough to the right to put you in your normal driving position as you drive away (about a meter from the kerb).

Why do I need the handbrake every time I stop?
Most roads have what is called a camber (which has been exaggerated in the picture). This is where the road slopes up toward the middle and down at the sides, to allow water drainage into the drains. This also means that when turning the car around it is a bit like going up hill and then downhill again. When you are facing downhill, applying the handbrake prevents you from rolling into the kerb in front of you when you release the foot brake. The same is true when you are reversing and the car is facing slightly up hill. On the test, it is not a requirement to apply the handbrake, but you will be marked down if you lose control and the car rolls into the kerb, so just apply the handbrake to stop this!
